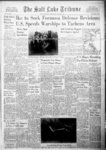
Show BUNS 11 CVS (AAOABUZ and Lessen Housekeeping Chores Witn a ' - www ‘'X m 'HHWjgw w for Your op i k 'u IT to I !y Ralph Treves aterlogged ted with a eeting that comes in ighten the i expensive onsiderably Success of the newly ' experience elastic as a s and other otherwise te old lino he old ply--I clean and used It is mod veneer h the thin ting usual- ary for the e back (any he kitchen about 1V4 clamp type ml snap-o- n iing dimensions h has been 4 removed ‘after plumbirte Is disconnected The plastic is applied over the entire counter surface then the oounter section is cut out to fit the sink rim Some sink bowls are very heavy and you may need help to remove the old counter and to put in the new one Follow these steps " Cut plastic to same size as the plywood When cutting with hand saw keep finished surface 'of plastic facing you hold saw at close angle use short strokes to prevent chipping Support cutaway edge so weight won’t start to " tear to use new i adhesive to plywood and back of APPLY sheet Use notched trowel to adhesive uniformly cover every bit of surface Allow to dry at least 40 minutes at room temperature Adhesive is volatile— don’t smoke extinguish any pilot lights ventilate room Cut “slip sheet" of brown wrapping paper cover the plywood then put on the plastic and line up the edges with the plywood Slip shbet will prevent bonding of plastic to plywood Lift on end of plastic and fold back about d of the paper Press down to bond that end of plastic then pull out rest of paper and complete bonding of entire panel Use rolling pin to apply pressure on plastic starting along center working out to all edges Klake cutout for sink bowl molding Use old sink counter as guide only after testing one-thir- r f whether the but trace outline of template for new rim Cutout must be accurately positioned so bowl will go back easily new style bowjs contain openings CERTAIN faucet lines In Others the water go through the splash above the sink start the Inside cuts by drilling one or two holes then use keyhole saw or electric sabre saw Put on metal moldings The channel-typsnap-omolding must be mitered at the corners This can be done with metal snips or a hacksaw but that 1s a tedious and exacting chore If possible borrow a mitering tool from a local cabinet shop This looks like a pair of pliers and will cut perfect corner miters in a second The tool costs about $10 and you may find it worthwhile to buy one for permanent t - j X s- If you have your camera loaded and handy at all times you can very often snap such shots as this classic use THE COVE molding is nailed along the back the splash fastened with nails or screws through the bottom of the sink counter The splash is edged along the top with cap molding Fasten the bowl In place to make the unit ready for slipping onto the sink cabinet fastening in place from underneath with screws restoring the water and soil pipe connections This is a difficult project but the result is well worth the effort in making the sink more efficient and beautifying the kitchen v Better Prints 1 by matching negative anti papers by Norris Harkncss f- OING on with the ques fof making your own prints and getting the maximum fun from your photography there is the problem of matching the negative and the paper to get the best possible print In “Making Contact Prints" the problems of exposure and general printing technique were covered but not what happens or what to do when the whole print Is too gray or too “soot and whitewash" when lighter areas are blank and darks are inky black When the print Is too even In its gray tone even after’ the exposure is best the paper was too “soft" it lacked enough inherent contrast to fit that of the negative The cure is to use a harder paper the “contrast" grade which may be No 3 or No 4 G f 'V 1 I 4 n if: es to kitchen when old linoleum learning colorful plastic surface I e r jurrftiiiiijj rim will fit otherwise clamp-typ- e follow position of opening from old panel This shows how the brown paper “slip sheet" Is used After plastic is aligned fold over paper at one end press plastic down Vi Vi the exposure trial with the various until you hit the best one but remember to keep the developing time standard Increasing it will do little good and cutting it to d save an print results in muddy blacks and a lack of good detail REPEAT Popuhr-Pttcc-tf pidurQ-ifha-tnitui- te over-expose- If the first trial was too contrasty try the lower numbered or “soft" grades but keep in mind the need for ac- $ v '5’ X R'eaJ rfectly Corners must be mitered ecial tool made for the purpose sidoy January 23 1955 sink rim fit into center cutout Sink JowI is held around run screws with through flanges at bottom! Caulk flange Clamp-typ- e curate exposure time Usually the harder papers the more contrasty grades need a little more exposure than the “normal" and the softer grades call for less with the same negative Making the best possible prints from your negatives calls for a little experimenting At first it seems complicated but soon you’ll look at a film and know almost exactly the right exposure time for right grade cf paper It’s easy and it s fun i i t i new low- New low price cost film light weight T1 2H x 31J! makes popular-size- d pie- -' pictures Now see your turcs — all finished — ia CJ seconds $gf95 fm imminlkn if Hll |